We brought up an issue of breakpoints for a desktop/laptop responsive site version in the previous article Responsive Web Design Using Breakpoints. Now it is time to talk about the mobile layout. Let us make two features clear for you to take full advantage of the information below. These features are viewport meta tag settings and the DPI. Though simple at first sight, these things cause much confusion.

Viewport Meta Tag
Let us leave lengthy theorizing aside and go straight to the practice.
Viewport Meta Tag is a command telling to the gadget how to scale the website. We would like to make an honest agreement on not trying to squeeze the mock-up evenly into the screen’s size, making the user’s vision blurry.
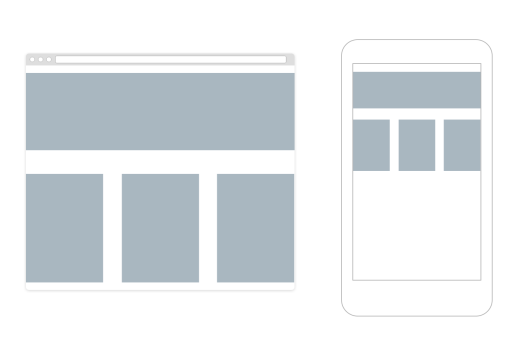


Add meta tag with parameters:
<head>

<meta name="viewport" name="width=device-width, initial-scale=1.0, maximum-scale=1.0, user-scalable=no"/>

</head>
Set any width supported by the device, launch the site in a 1:1 scale and forbid further zooming.
What Happens When You Ignore Viewport:
Devices will scale the mock-up at random, leaving you no way to find out, how many pixels are actually displayed in the browser’s window.
DPI
DPI is a quantity of pixels (dots) per inch.
Modern mobile phones and some PCs have the pixels density of over 72. However, we do not believe their producers: they do not tell us the whole truth about coordinates used to display mockups. The mere size of screens in pixels does not say enough to do the math.
The thing is, mobile browsers use their own points, not equal to the physical pixels of a device. Usually these points are divisible by two in order to make information volumes visually comparable, considering the physical dimensions of devices. For instance, 1000 pixels for a smartphone is the size of a palm, 1000 pixels for a PC is the size of an A4 landscape sheet. That is why a mock-up which looks easy-to-eye on PC will look small and unreadable on the display’s screen.
iPhone 6 Example
iPhone 6 is 750 pixels wide. However, the browser divides this value by two and thinks that the full width mock-up has 375 pixels. A 750 pixels-mock-up will be either displayed only in half or squeezed in, depending on viewport settings.
Our honest agreement, however, keeps us from squeezing. It leaves us only displaying the mock-up correctly in 375 pixels, which are the said points in terms of high DPI mobile devices.
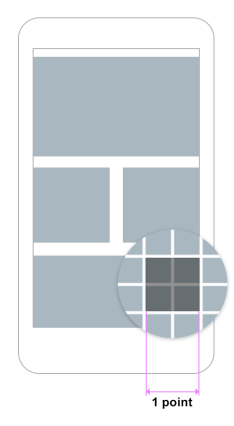
2 pixels of the gadget’s screen horizontally equal 1 pixel (point) for browser. The same in vertical direction.
Mobile Device Detection
We remember from the first part to use an abstract styles.css file with all styles and a responsive.css file containing breakpoints and styles for different statuses of the desktop version of a site.
Now we need 2 additional css files, for tabs and for smartphones. The files are added in this order:
- styles.css
- responsive.css
- phone.css or tab.css
To identify device type, use a server-side method: for example, PHP class mobile detect.
<head>

<meta name="viewport" name="width=device-width, initial-scale=1.0, maximum-scale=1.0, user-scalable=no"/>

<link href="/css/styles.css" rel="stylesheet" type="text/css"/>

<link href="/css/responsive.css" rel="stylesheet" type="text/css"/>

<?php

require_once 'Mobile_Detect.php';

$detect = new 'Mobile_Detect';

if ($detect->isMobile() && !$detect->isTablet()) {

echo '<link href="/css/phone.css" rel="stylesheet" type="text/css">';

}

if ($detect->isTablet()) {

echo '<link href="/css/tab.css" rel="stylesheet" type="text/css">';

}

?>

</head>
All the CSS styles for mobile devices are written in the phone.css and tab.css files; we also include media queries to avoid a pileup of files. The logic of breakpoints activation is the same as for desktop/laptop versions, namely a cascaded inheritance of properties from the largest scale to the smallest one (see Part 1). Sometimes you only need 2 variants of style to be coded, for landscape and for portrait orientation. The minimal width is 320 pixels, while the said iPhone 6 Plus is 414 px wide: that is why some elements need to be adjusted to the size of the browser’s window.
Server Side Vs CSS & JS Detection
Traditionally gadgets have a high dots density, a higher than 1.5 pixel ratio, and smaller screens than desktops. However, technologies change and limits become more and more blurred. Apple laptops and desktops, for one, already got retina displays with a higher dots density. Resolutions of tablets and laptops have been already comparable for a while.

If you do not have a bulletproof solution for CSS-detection you will google to find a great deal of variants. All else being equal, the service-side device detection method is useful for small and medium web projects (see Part 1), as it:
- works easily and reliably
- does not require you to make up conditions by searching parameters of devices
- enables an easy fine-tuning of interface elements and content design
All CSS files can be divided according to purpose:
- Common files for the UI and content + desktop/laptop styles (the latter can be made separately or placed into the 2nd file of this list).
- File for supporting the desktop version responsiveness.
- Mobile devices only.
- File containing only css-animations.
The code will be more readable and less cluttered. While tuning your work with separate files, each having a specific function.
Consider animations: they are, including durations and easings, pretty bulky. Being kept in a separate file, they will not interfere with the adjusting of main styles, and in case of doubt you can turn them off until you find the problem.
JavaScript is another method of device detection. However, if you do not want to reinvent the wheel, you have to install an external script or plugin. You will assign class mobile to tag body according to results and build up styles for devices of the .mobile .element { } type without dividing the styles into separate files.
The server-side device detection method has an advantage. It turns a small chunk of your code within the head tag containing conditions for linking style sheets into a somewhat of a headquarter, where tasks are distributed. This way you can enable not only different style sheets, but JavaScript files and chunks of code for specific devices as well.
It is simple and it works. You need less time to do that than you have already spent on reading this article.
More About CSS for Mobile Device
Media queries in CSS for smartphones are set like in the main site version. Don’t be confused that in css pixels are pointed out. This is css notation. The same points are meant here.
@media screen and (max-width: 640px) {

}

@media screen and (max-width: 480px) {

}

@media screen and (max-width: 375px) {

}
Here are some media queries to detect device orientation:
@media screen and (orientation: landscape) {

}

@media screen and (orientation: portrait) {

}
The combinations with coordinates and orientation may also be useful:
@media screen and (orientation: portrait) {

@media screen and (max-width: 1200px) {

}

@media screen and (max-width: 1024px) {

}

}

@media screen and (orientation: portrait) {

@media screen and (max-width: 1024px) {

}

}
Two Lifehacks
Lifehack # 1
iPhone – to prevent shortsightedness, apparently – enlarges fonts it finds too small without asking. To avoid this, write in the file phone.css:
html {

-ms-text-size-adjust: none;

-webkit-text-size-adjust: none;

}
Lifehack # 2
This inappropriate situation makes iPhones and iPads ignore viewport settings, interfering with fine tuning. There is often a bar navigation element with different buttons, fixed in the upper part of your mock-up and having the following properties:
width: 100%;

height: 40px;

position: fixed;

top: 0;

left: 0;

min-width: 990px;

z-index: 10p;
The property min-width: 990px is necessary only for the main version; you do not need it for the mobile one. You expect the element to spread out of screen boundaries, as its minimal width is too big. Far from it! iPhone decides to ignore viewport and forcefully squeezes whole mockup in such a way so that this element can fully fit into a screen so that entire website content badly decreases (see Pic.1). Stay alert and set the minimal width for fixed elements, as sometimes gadgets work against any logic.
Summary
- Detect device type with the server-side method using php class (you can find similar solutions for other languages).
- Continue making breakpoints with the size of the browser’s window reducing; the same way as in the main design version (the methods are covered in the previous article). It means your mobile layout inherits properties from the most compact desktop design.
- Using the methods described for adding the necessary style sheets and scripts for each specific device as your construction kit, you can separate the CSSs of mobile and desktop versions to make them visually independent.
- Remember to set specific viewport parameters.
It is unlikely that you will need additional media queries detecting retina to optimize graphics. Now all smartphones have a high DPI, so the styles in phone.css are completely suitable for them.


